The Eloquence Plug-in
Eloquence is a plug-in for the Eclipse IDE to allow seamless and automated integration of aspect-oriented design pattern implementations with Java/AspectJ projects.
Installing the design pattern plug-in
Eclipse has a built-in mechanism to manage the workspace configuration and the features available to the platform installation. Eloquence makes use of these mechanisms to enable the transparent installation, activation, deactivation, and deinstallation of the design pattern plug-in. In Eclipse, collections of one or more plug-ins are bundled into features and features are provided through update sites; users can browse update sites and select tools that they wish to install. Eclipse provides tools to find and install as well as manage the configuration of plug-ins. In this guide, we assume that Eclipse has already been properly configured with both the Java Development Tools (JDT) plug-in and the AspectJ Development Tools (AJDT) plug-in. The following describes the setup of the design pattern plug-in through its update site, http://eloquence.sourceforge.net.
To install the design pattern plug-in, select
from the workbench menu of Eclipse. The following wizard will appear:

As it is shown in the screenshot, select Search for new features to install and then continue with Next. This will cause the following dialog to appear:

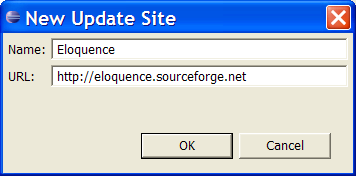
This dialog shows all the existing update sites known to the running Eclipse configuration. In a fresh installation containing only the Java Development Tools (JDT) plug-in and the AspectJ Development Tools (AJDT) plug-in, the dialog should be identical to the one shown in the screenshot. You have to add the update site of Eloquence to add the design pattern plug-in. To do so, click New Remote Site. The following dialog will pop up:

The update site for Eloquence is http://eloquence.sourceforge.net. Fill in the information as shown in the screenshot and then confirm by clicking OK. Eclipse then returns to the dialog showing all the existing update sites known to the Eclipse configuration.

The list of update sites now includes Eloquence. Ensure that, as in the screenshot, only the item corresponding to Eloquence is checked and then click on Finish to continue. Eclipse will now contact the Eloquence update site and retrieve information on the plug-ins that it contains. You will be presented with the following dialog showing the features provided by the update site:

Eloquence (at the moment) only contains one feature, namely the design pattern plug-in. To install this feature, ensure that the items are checked as in the screenshot, and then proceed by clicking Next. The following dialog will succeed:

In order to install the design pattern plug-in, you need to state that you Accept the terms in the license agreement of the design patterns plug-in, which is, as the screenshot shows, the GNU General Public License (GPL). Proceed by clicking Next.
The subsequent dialog will display a summary of the features that you have selected to install; ideally it should look as the following screenshot. Confirm this, and then select Finish to download the design pattern plug-in.

You will see a progress dialog downloading the design pattern plug-in. The dialog will disappear once all files have been downloaded, and you will also be prompted again whether you would like to install the design pattern plug-in as the following screenshot shows:

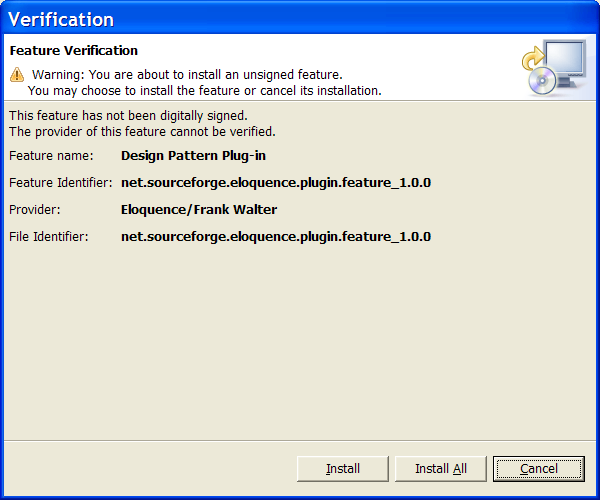
Eclipse verifies whether it can determine the origin of a plug-in to be installed through attached cryptographic signatures. Presently, the design pattern plug-in has not been signed, hence you see a warning stating this very fact as shown in the screenshot. You can safely ignore this warning and click Install All. This will install the design pattern plug-in. Upon completion, there will be a prompt to restart the workbench:

Click Yes. Once the workbench has been closed and opened again, you are ready to use the design pattern plug-in. However, usually you will not yet see the design pattern catalog and the design pattern information views. Change to your favourite perspective, and select
The following screenshot shows the dialog that will appear:

One by one, select both the catalog and the information views from the design pattern plug-in category and click OK. This will add the views to your perspective; the following screenshots show the two views:


As any other view, you can move and resize these two views to place them in a location which is the most convenient for you. This step completed the installation procedure -- you are now ready to use the design pattern plug-in within your projects.